Wednesday, November 9, 2011

Thanksgiving Gift

Stamps: French Foliage 120845(w), 121166(c)
Cardstock: Peach Parfait 119794, Very Vanilla 101650, Cajun Craze 119684, Spice Cake designer series paper 124003
Ink:  Classic Stampin' Pads: Old Olive 100702, Cajun Craze 119671, Daffodil Delight 119667
 Accessories:  3/8" Velvet Stitched Ribbon 125637,  Big Shot with Naturally Serif decorative strip sizzlet 113453 , Big Shot Multipurpose Adhesive Sheets 120805, glue dots 103683

Directions:
1.  click here for tutorial on box
2. Punch one Decorative Label in very vanilla and one in cajun craze.  Cut the cajun craze one in half lengthwise and glue to the back of the vanilla one as a border (see photo).
3. Attach a piece of ribbon around the box about 1.5" from the bottom.  Attach the label over the ribbon.
3. Cut a 2"x7" strip of designer paper and multipurpose adhesive sheet and stick together.  Cut into small squares and place over the letters on the Naturally Serif strip to spell "Thankful".  Run through the Big Shot.  Peel and stick the letters onto the label and ribbon.  TIP: start in the center with N and work out.

Elegant Hand-Penned Holiday Card

Embossing just says "fancy"!  And you do two types on this card--but it's really not a fussy card to make.

Supplies needed:
Stamp sets: Hand-Penned Holidays 124310(w), 124312(c) and 115026(w)
Cardstock: Always Artichoke 105119, Cherry Cobbler 119685
Ink: VersaMark Pad 102283
Accessories:  Big Shot with Framed Tulips Embossing Folder 121809, Gold Stampin' Emboss Powder 109129, Heat Tool 100005, Basic Pearl Jewels 119247

Directions:
1.  Cut Always Artichoke cardstock 11" x 4-1/4", score on the long side at 5-1/2" and fold for card base.
2.  Cut Cherry Cobbler cardstock 5-1/4"x4", insert in Framed Tulips embossing folder and run through the Big Shot.
3.  Ink Merry Christmas with VersaMark, stamp it at bottom of cardstock and sprinkle with the gold embossing powder.  Tap off excess and use Heat Tool until set.
4.  Ink the large pine tree with VersaMark and stamp onto cardfront.  Add pearls and attach to card base, centering with about 1/8" border.


Cozy Lodge Christmas Card

Send warm Christmas greetings with this easy-to-make card.
Supplies needed:
Stamp sets: Hand-Penned Holidays 124310(w), 124312(c) and Autumn Days 115452(w), 120000(c)
Cardstock: Garden Green 102584, Whisper White 100730, Frostwood Lodge designer series paper 124002
Ink: Garden Green 102272, Cherry Cobbler 119669
Accessories:  5/8" Satin Chocolate Chip ribbon 125327, Stampin' Sponges 101610, glue dots103683

Directions:
1.  Cut Garden Green cardstock 8-1/2"x 5-1/2", score on the long side at 4-1/4" and fold to make card base.
2.  Cut a piece of Frostwood Lodge designer series paper 5-1/4" x 4" and adhere to card front.
3.  Cut a piece of chocolate chip ribbon 5-1/2" and adhere to card front with glue dots.
4.  Cut a piece of whisper white cardstock 4-1/4" x 2".  Ink the greeting with cherry cobbler ink and stamp onto whisper white.  Sponge around the edge with cherry cobbler ink.
5.  Ink the pine branch design from Autumn Days stamp set in Garden Green.  Stamp once onto scrap paper, than onto the image panel in the upper left corner.  Repeat for lower right corner.  Attach to card front over the ribbon.

Thanksgiving Place Cards

If you're hosting the holiday meal, chances are you will be busy days ahead with preparations so here are two quick and simple ways to add a decorative touch and keep your guests in order!
Supplies needed for the shabby chic design:
Stamp set: Hand-Penned Holidays 124310(w), 124312(c)
Cardstock: Soft Suede 115318, Very Vanilla 101650
Ink: VersaMark pad 102283, Soft Suede Stampin' Write Marker 120973
Accessories: 1/2" Peach Parfait Poly-Stitched Ribbon 119264, Early Espresso/White Baker's Twine 123124, crop-A-dile 108362, Modern Label Punch 119849

Directions:
1. Cut a piece of Soft Suede cardstock to 4-1/4"x 4", score and fold on the 4" side in the middle at 2".  Tear off one edge.
2. Ink the Give Thanks sentiment with VersaMark and stamp onto the folded piece.
3.  Cut a 5" piece of Peach Parfait ribbon.  Use Crop-A-Dile to punch two holes in the top left corner.  Starting on front side, push each end of the ribbon through a hole. Flip the cardstock over, crisscross the ribbon ends and poke back through the holes.  Adjust and trim ends.
4.  Punch out the Modern Label shape from Very Vanilla cardstock.  Using the soft suede marker write the guest's name.  Trim off one end with scissors, punch a hole with the crop-a-dile, and attach with the baker's twine. (see photo)


 Or maybe you prefer a more casual look.  The waffle paper works as a napkin ring.


Supplies needed:
Stamp set: French Foliage 120845(w), 121166(c)
Cardstock: Very Vanilla 101650
Ink: Cajun Craze 119671, Daffodil Delight 119667, Soft Suede Stampin' Write Marker 120973
Accessories: Waffle Paper (metallic gold) 120984, Hemp Twine 100982, Stampin' Sponges 101610, Decorative Label Punch 120907, Crop-A-Dile 108362

Directions:
1.  Punch out a Decorative Label in Very Vanilla cardstock.
2.  Ink up the large oak leaf with Cajun Craze and stamp onto the label.  Write guest's name using the soft suede marker.  Sponge the edge's with Daffodil Delight.
3.  Punch a hole in the corner with the crop-a-dile.
4.  Cut a piece of waffle paper 12" long. Rotate the piece and cut in thirds, approx. 3" wide each.  Tie one length of waffle paper around the napkin.  Tie on the tag with hemp twine.


Saturday, October 8, 2011

Halloween Treat

Supplies needed:

STAMPS: Teeny Tiny Wishes 115360w

INK: Pumpkin Pie 105216 and Old Olive 102277 Classic Stampin' Pads

CARDSTOCK: Old Olive 100702,  Pumpkin Pie 105117, Whisper White 100730

TOOLS AND ACCESSORIES: Modern Label Punch 119849, Extra-Large Oval Punch 119859, Stampin' Sponges 101610, Cellophane Bags 124134, glue dots 103683, Anywhere Glue Sticks 104045


Directions:
  1. Punch 3 ovals in Pumpkin Pie, sponge edges with Pumpkin Pie.  Glue together
to form a pumpkin--see picture.
2.  Punch 1/2 a Modern Label punch in Old Olive and glue behind pumpkin for a stem.
3. Stamp greeting in Old Olive onto whisper white. Punch out with Modern Label Punch. Glue to front of pumpkin.
4. Fill cellophane bag, close top, attach pumpkin with glue dots.

Friday, October 7, 2011

Spice Cake Fall Card

Supplies Needed:


Stamps: Button, Button 122026(w), 122040(c)

Cardstock: Wild Wasabi 108641, Chocolate Chip 102128, So Saffron 105118, Spice Cake desiger series paper 124003

Ink:  Old Olive Classic Stampin' Pad 100702

Tools and Accessories: In Color Designer Printed Brads 122940, Chocolate Chip 1/2" Scallop Dots Ribbon, Scallop Edge Border Punch 119882 Big Shot with Daisy #2 Bigz Die 114520, glue dots 103683, adhesive, paper cutter, scissors


Directions:
  1. Cut Wild Wasabi cardstock to 8-1/2"x4-1/4", score and fold in half (at 5-1/2") to make card base.
  2. Ink up 2 or 3 button stamps with the Old Olive stamp pad and stamp the front of the card.
  3. Trim a piece of the Spice Cake paper to 4"x 3-1/4".
  4. Punch a scalloped edge along the long side of a piece of Chocolate Chip cardstock.  Trim the scallop off at about 3/4".  Cut this strip in 1/2 and layer behind the Spice Cake piece, trimming the ends.
  5. Cut a piece of ribbon 4-1/2" long.  Lay ribbon on Spice Cake paper about 3/4" from bottom and attach ends to the back with glue dots.  Attach the whole panel to card front, centered.
  6. Place 3 layers of So Saffron cardstock on the die and run through the Big Shot.  Use the small and medium flowers.  Stack the flowers, offsetting slightly to show all the petals.  You can use a little glue near the center to hold the layers in place.  Secure with the brad.  Attach to the card with glue dots.

Thursday, September 8, 2011

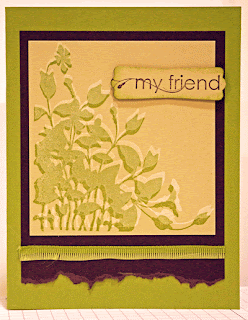
Highlighting Technique

Directions:
1. Ink the large leafy stamp ink Craft White ink and stamp onto River Rock cardstock.  Clean stamp thoroughly with Stampin’ Mist.  Ink the stamp with Lucky Limeade and stamp on top of the white image just slightly lower.  Trim River Rock piece close to the image so it ends up 3-1/2” tall by 3-3/8´wide.
2. Ink “my friend” in Early Espresso and stamp on scrap of River Rock cardstock.  Punch out with Modern Label Punch.  Sponge the edges with Lucky Limeade.
3.  Cut a piece of Early Espresso cardstock 4-3/4” x 3-3/4”.  Tear about ¼” from the bottom.  Attach image panel using Multipurpose Liquid Glue leaving a 1/8” border along sides and top.
4. Cut Lucky Limade cardstock in half so piece is 8-1/2”x 5-1/4”.  Score and fold it in half.  Attach the image panel on front using Multipurpose Liquid Glue.
5. Cut a piece of ribbon 3-3/4” long.  Trim the bound edge off one side and pull threads out to fray.  Attach below image with Mulitpurpose Liquid Glue.
6.  Attach the sentiment with 2 Stampin’ Dimensionals.

Big Shot Sunflower Box


DIRECTIONS:

1. Using Chocolate Chip Card Stock and Fancy Favor Die, cut out one box.
2. Using Finial Press Embossing Folder, run through Big Shot to texturize your box.
3. Fold and crease along score lines and put box together using Sticky Strip.
4. Using More Mustard Card Stock and Daisies #2 Die, cut out daisies. Sponge edges of each flower with Early Espresso Classic Ink. Set Aside.
5. Using Square Lattice Embossing Folder and scrap of Chocolate Chip Card Stock, run through Big Shot and then punch out a circle using 1 3/8" Circle Punch. Punch out small circle of More Mustard Card Stock using 1" Circle Punch. Set Aside.
6.Punch out 2 large ovals using Wild Wasabi Card Stock and run through the Crimper, using a pair of scissors to for the leaf "point". Sponge around edges of each leave using Early Espresso Ink.
7. Cut 36" of Hemp and wrap around box several times.
8. Adhere More Mustard circle to Hemp using several glue dots, then adhere leaves to circle using glue dots, the daisies and then the large Chocolate Chip Circle for the center of the sunflower.
9. Fill with desired treats and sit back and bask in the praise!

Spice Cake Scrapbook Layout

Directions

1. Cut 8” x 8” from Pear Pizzazz Card Stock.
2. Cut 8” x 1 ¾” from Chocolate Chip Card Stock.
3. Cut 8” x ½” strips from Spice Cake Designer Series Paper . Center three Spice Cake strips on the Chocolate Chip Card Stock with Dotto (repositionable) Adhesive. Attach the Chocolate Chip Card Stock to the Pear Pizzazz Cardstock with Dotto (repositionable) Adhesive.
4. Peel back several inches of the Spice Cake Designer Series Paper from the bottom of the Chocolate Chip pieces and reposition in a woven pattern.
5. Stamp sentiment on a scrap piece of Very Vanilla Card Stock. Tear long edges and sponge with Chocolate Chip Classic Ink.
6. Crumple and then smooth out 3 ½” x 3 ½” Very Vanilla Card Stock. Sponge with Pool Party Classic Ink.
7. Thread Spice Cake Designer Button with Natural Hemp Twine. Attach with Mini Glue Dots.


Gently Falling Thank You Card


Instructions:
1. Create card base from Soft Suede card stock (5 ½” x 8 ½”)
2. Using Pear Pizzazz, River Rock and More Mustard Classic Ink Pads, stamp solid leaf images randomly on Very Vanilla card stock panel (4” x 4 ½”). Using Soft Suede Classic Ink Pad, stamp corresponding outline leaf images.
3. Run stamped Very Vanilla Card Stock panel through Big Shot with Square Lattice Embossing Folder.
4. Adhere stamped/textured Very Vanilla panel to card front.
5. Adhere strip of Spice Cake Designer Series Paper (striped pattern – 1 ½” x 4”) to lower portion of card front.
6. Using Very Vanilla Craft Pad, stamp “Sending Many Thanks” greeting on Soft Suede card stock piece (1 ½” x 4”). Cover with Clear Embossing powder and heat emboss with Heat Tool. Tear bottom edge. Adhere on card front over the seam of the Very Vanilla Card Stock and Designer Series Paper.
7. Thread Baker’s Twine (10”) through More Mustard Spice Cake Designer Button and tie into a bow. Adhere to card using Mini Glue Dots.

Wednesday, August 3, 2011

Mocha Morning Elegance

Intructions:
1. Take 11 x 4-1/4” piece of Crumb Cake Card Stock. Fold in half and crease with Bone Folder to create card base. Take 4 x 3-1/2” piece of Basic Black Card Stock. Stick 3-7/8 x 3-3/8” piece of flocked paper to card stock using SNAIL adhesive. Stick to bottom of card as shown.
2. Stamp birthday greeting to top right of card front. Wrap a 9” length of satin ribbon around card, attaching with Mini Glue Dots. Make the seam off-center.
3. Take a black glimmer brad and open the prongs. Take a 4” length of satin ribbon and place between prongs. Squeeze prongs together, crisscrossing them and flattening them. Attach to ribbon on card front with Mini Glue Dot. Trim ribbon ends to desired length.

Tuesday, August 2, 2011

Blue Ribbon Birthday Card


Instructions:

1. Cut standard card base from Not Quite Navy cardstock. Cut second and third layer from Pool Party cardstock.
2. Ink the letterpress plate with Not Quite Navy Craft ink, place Pool Party cardstock onto letterpress plate and run through the Big Shot.
3. Punch edge of Pool Party cardstock (layer #2) with the scallop trim border punch. Adhere 6” of Basic Black satin ribbon to right side of card as shown and adhere cardstock layers to card front.
4. Cut ¾” x 12” strip of First Edition Specialty paper. Score strip every ¼”. Fold like an accordion and glue both ends together. Press the circle together until the inside edges touch and glue the inside to maintain a circle shape.
5. Stamp “Happy Birthday” image onto Whisper White cardstock with Pool Party ink. Punch image out with scallop circle punch. Clean stamp and stamp image again with Not Quite Navy ink. Punch out inside of image with 1” circle punch. Adhere to accordion circle as shown using a Stampin’ Dimensional.
6. Cut 2 – 1” x 3” pieces of Pool Party cardstock for ribbon tails as shown. Cut 2 – 3” pieces of Basic Black satin ribbon. Layer ribbon onto cardstock as shown and adhere to back of accordion circle. Adhere completed “prize” ribbon to card as shown.