Thursday, September 8, 2011

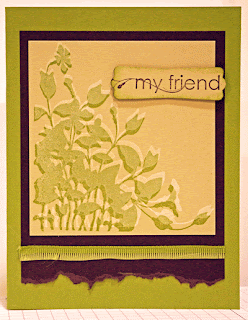
Highlighting Technique

Directions:
1. Ink the large leafy stamp ink Craft White ink and stamp onto River Rock cardstock.  Clean stamp thoroughly with Stampin’ Mist.  Ink the stamp with Lucky Limeade and stamp on top of the white image just slightly lower.  Trim River Rock piece close to the image so it ends up 3-1/2” tall by 3-3/8´wide.
2. Ink “my friend” in Early Espresso and stamp on scrap of River Rock cardstock.  Punch out with Modern Label Punch.  Sponge the edges with Lucky Limeade.
3.  Cut a piece of Early Espresso cardstock 4-3/4” x 3-3/4”.  Tear about ¼” from the bottom.  Attach image panel using Multipurpose Liquid Glue leaving a 1/8” border along sides and top.
4. Cut Lucky Limade cardstock in half so piece is 8-1/2”x 5-1/4”.  Score and fold it in half.  Attach the image panel on front using Multipurpose Liquid Glue.
5. Cut a piece of ribbon 3-3/4” long.  Trim the bound edge off one side and pull threads out to fray.  Attach below image with Mulitpurpose Liquid Glue.
6.  Attach the sentiment with 2 Stampin’ Dimensionals.
Big Shot Sunflower Box


DIRECTIONS:

1. Using Chocolate Chip Card Stock and Fancy Favor Die, cut out one box.
2. Using Finial Press Embossing Folder, run through Big Shot to texturize your box.
3. Fold and crease along score lines and put box together using Sticky Strip.
4. Using More Mustard Card Stock and Daisies #2 Die, cut out daisies. Sponge edges of each flower with Early Espresso Classic Ink. Set Aside.
5. Using Square Lattice Embossing Folder and scrap of Chocolate Chip Card Stock, run through Big Shot and then punch out a circle using 1 3/8" Circle Punch. Punch out small circle of More Mustard Card Stock using 1" Circle Punch. Set Aside.
6.Punch out 2 large ovals using Wild Wasabi Card Stock and run through the Crimper, using a pair of scissors to for the leaf "point". Sponge around edges of each leave using Early Espresso Ink.
7. Cut 36" of Hemp and wrap around box several times.
8. Adhere More Mustard circle to Hemp using several glue dots, then adhere leaves to circle using glue dots, the daisies and then the large Chocolate Chip Circle for the center of the sunflower.
9. Fill with desired treats and sit back and bask in the praise!

Spice Cake Scrapbook Layout

Directions

1. Cut 8” x 8” from Pear Pizzazz Card Stock.
2. Cut 8” x 1 ¾” from Chocolate Chip Card Stock.
3. Cut 8” x ½” strips from Spice Cake Designer Series Paper . Center three Spice Cake strips on the Chocolate Chip Card Stock with Dotto (repositionable) Adhesive. Attach the Chocolate Chip Card Stock to the Pear Pizzazz Cardstock with Dotto (repositionable) Adhesive.
4. Peel back several inches of the Spice Cake Designer Series Paper from the bottom of the Chocolate Chip pieces and reposition in a woven pattern.
5. Stamp sentiment on a scrap piece of Very Vanilla Card Stock. Tear long edges and sponge with Chocolate Chip Classic Ink.
6. Crumple and then smooth out 3 ½” x 3 ½” Very Vanilla Card Stock. Sponge with Pool Party Classic Ink.
7. Thread Spice Cake Designer Button with Natural Hemp Twine. Attach with Mini Glue Dots.


Gently Falling Thank You Card


Instructions:
1. Create card base from Soft Suede card stock (5 ½” x 8 ½”)
2. Using Pear Pizzazz, River Rock and More Mustard Classic Ink Pads, stamp solid leaf images randomly on Very Vanilla card stock panel (4” x 4 ½”). Using Soft Suede Classic Ink Pad, stamp corresponding outline leaf images.
3. Run stamped Very Vanilla Card Stock panel through Big Shot with Square Lattice Embossing Folder.
4. Adhere stamped/textured Very Vanilla panel to card front.
5. Adhere strip of Spice Cake Designer Series Paper (striped pattern – 1 ½” x 4”) to lower portion of card front.
6. Using Very Vanilla Craft Pad, stamp “Sending Many Thanks” greeting on Soft Suede card stock piece (1 ½” x 4”). Cover with Clear Embossing powder and heat emboss with Heat Tool. Tear bottom edge. Adhere on card front over the seam of the Very Vanilla Card Stock and Designer Series Paper.
7. Thread Baker’s Twine (10”) through More Mustard Spice Cake Designer Button and tie into a bow. Adhere to card using Mini Glue Dots.