Tuesday, January 3, 2012

Desk Calendar


Supplies:
Cardstock: Night of Navy (100867), Whisper White (100730), Bashful Blue (105120), Peach Parfait (119794), Rose Red, (102544)
Stamp Sets: Four Frames ((123440 wood) or (123442 clear), Elements of Style (118611 wood) or (120045 clear), Calendar Alphabets and Letters (111610)
Accessories: Decorative Label punch (120907), Scallop Oval punch (119856), Watercolor pencils (101879), Basic Black Classic Ink (101179), 1/8” Taffeta Ribbon, Daffodil Delight (119254), Stamp-a-ma-jig (101049), Stampin’ Dimensionals (104430), Crop-A-Dile (108362)
Other: Calendar was downloaded from this address: http://www.calendarsquick.com/printa...dexCardTwoYear
If you are a My Digital Studio user you may have the calendar to use instead of downloading from the link above.

Instructions:
1. Stamp one of each of the Four Frames images with Basic Black onto Whisper White cardstock. Stamp the year using the Calendar Alphabets and Letters with Basic Black ink. The Stamp-a-ma-jig will help to keep the letters straight. Color the images using Watercolor pencils. Once colored and stamped with the year, punch each shape out with the Decorative Label punch.

2. The calendar base is cut 81/2” x 5 1/2” from Night of Navy cardstock. Fold in half to make a 5 1/2” x 4 1/4” base.

3 .Cut 4 pieces of Whisper White cardstock to measure 4” x 5 1/4”. Stamp the large
floral image onto the upper left corner of each piece. Let dry a bit, so ink does not
bleed, before coloring the flowers with watercolor pencils. Mount in place on top of
each side of the Night of Navy, top, bottom, front and back. The photo shows some of
inside of calendar where the other months are.

4. Cut the calendar into 4 sections. The cut the background cardstock 5 1/8” wide and 1/4” larger then the height of the calendar pieces. Adhere in place.

5. Punch out 4 Scallop Oval shapes of each color used to mount the calendars onto. Glue in place behind the images that have been punched out of the Decorative Label punch. Use dimensionals to hold them in place.

6. Once the calendar is assembled fold into place. Punch two holes with the small hole of the Crop-A-dile one hole on each side of the center of the calendar and up about 3/8” from the bottom.

7. Thread the Daffodil Delight ribbon through the holes. Tie tight for giving but be sure to leave enough ends to the ribbon so it can be tied looser to stand up.

Happy New Year and enjoy your pretty calendar all year long!

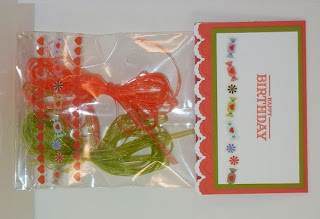
Ribbon Cello Treat


(I have no idea why Blogger insist on laying this picture down?!)


Supplies:
Stamps: Sweet Cake (wood: 125490, clear: 125492)
Paper: Calypso Coral (122925), Lucky Limeade (122926), and Whisper White (100730) card stock; 4”x6” cello bag (102757)
Ink: Calypso Coral Classic Stampin’ Pad (122939)
Accessories: Sweet Shop stickers (125584); Adorning Accents Edgelits Dies (125595); Adoring Accents Textured Impressions Embossing Folders (125601)

Directions:
1. Apply 2 rows of stickers to the bottom on the 4” x 6” cello bag.
2. Fold a quarter-sheet of Calypso Coral card stock in half and emboss bottom edge with the Adoring Accents (scallop-shape) embossing folder. Line up the matching Edgelits die and cut the scallop shape. Cut a matching strip of Whisper White card stock and adhere underneath for a contrasting look.
3. Stamp “Happy Birthday” on a small piece of Whisper White card stock with Calypso Coral ink and add another row of stickers to the bottom. Layer onto Lucky Limeade card stock. Adhere to folded topper.
4. Insert gift into cello bag and attach topper with double-sided tape.

Scrapbook--Beautiful (and easy) Baby Page


SUPPLIES:
Card Stock: Soft Suede 8 1/2 x 11 Smooth Card Stock (120973)
Ink: Soft Suede Classic Ink (115657)
Accessories: Beau Chateau Designer Series Paper (122357), Beau Chateau Side Notes (122379), Crochet Trim Victoria (118481), Designer Buttons Soft Subtles (119745), Designer Buttons Neutrals 9119743)Jewels Basic Pearls (119247), Stampin Sponges (101610), SNAIL Adhesive (104332), Scallop Edge Border Punch (119882), Mini Glue Dots (103683)

DIRECTIONS:
1. Using Soft Suede Ink and Stampin Sponge, sponge around edges of "Cherish" piece from Beau Chateau Designer Series Paper. Set aside.
2. Cut 5 x 5" square of Soft Suede Smooth Card Stock to use as photo mat; cut 4 x 2" piece of Soft Suede Smooth Card Stock to use as "It's A Girl" mat.Place on "Cherish" 12 x 12 piece as desired
3. Select Subtles buttons of choice and use a 2 inch piece of Victoria lace cut in half lengthwise to put through button holes on 2 of the large buttons. Set aside
4. Use one large Vanilla Button and put small flower button on top using mini glue dot. Put on large Basic Pearl on top. Set aside.
5. Using Scallop Edge Border Punch, punch border on "It's A Girl" piece.
6. Cut 7" piece of Victoria Lace Ribbon and tie around piece from #5. Layer onto Soft Suede mat from #2.
7. Adhere "Je T'aime" card from Side Notes pack onto lower right corner of page and adhere Vanila button stock on top using 2 mini glue dots.
8. Put 7 of the largest Basic Pearls along the bottom edge of the 5 x 5 Soft Suede piece and then place photo on top.

 You're done!

Take it to Heart Valentine


Supplies:
Stamps: Take It To Heart (125520 - W; 125522 - C); Teeny Tiny Wishes (115370)
Ink: Pretty In Pink (101301); Basic Gray(109120)
Card Stock: Naturals White (102316) 5 1/2” x 8 1/2”; 3 3/4” square; Scraps to create
impressed squares and sentiment; Pretty In Pink (100459) 4” square; 2 1/4” x 3/4” for
sentiment matte
Other Supplies: 1/2” Scallop Dots Pretty In PInk Ribbon (124141), Stampin' Sponges (101610), Stampinʼ Dimensionals (104430), SNAIL Adhesive (104332), Full Heart Punch (119883), Big Shot (113439), Texture Impressions Embossing Folders: Adorning Accents (125601); Stripes (123128);
Houndstooth (123134); Square Lattice (119976); Perfect Polka Dots (117335); Elegant
Lines (119277); Petals-a-Plenty (116824); Vintage Wallpaper (120175); Snow Burst
(124096)
Optional: Simply Scored Scoring Tool (122334)

Directions:

1. Score and fold the 5 1/2” x 8 1/2” piece of Naturals White card stock to create your card
base.
2. Run each of the scrap pieces of Naturals White card stock through the Big Shot, using a
different embossing folder for each piece. Use the 1 1/4” square punch to create a
square of each embossed design. (Or, if you prefer, you can first punch the squares
and then run them through the Big Shot. I create a larger piece of textured card stock
that allows me to make more than one card.)
3. Attach the nine embossed, punched squares onto the solid square of the 3 3/4” square
of Naturals White card stock. Edges of each smaller square should meet up tightly but
not overlap.
4. Attach the 3 3/4” card stock piece from the last step onto the 4” square piece of Pretty in
Pink card stock. Next, apply adhesive on the back of each edge of the Pretty in Pink
card stock square, lay the Pretty in Pink Scalloped Dots ribbon across the front and
wrap the ends to the back, using the adhesive around the edges to secure the ends.
Adhere this piece to the card front.
5. Now itʼs time for stamping. Take the heart image from the Take It To Heart stamp set
and, using Pretty In Pink ink, stamp it onto a scrap piece of Naturals White card stock,
using the Full Heart heart punch to punch out the image.
6. Use the Happy Valentineʼs Day sentiment from the Teeny Tiny Wishes stamp set. Ink it
with Basic Gray ink, and stamp off ONE time before stamping on the scrap piece of
Naturals White card stock. Trim to fit on the Pretty in Pink matte card stock.
7. Use a sponge and Pretty in Pink ink, sponge the edges of both the punched heart
image and the stamped sentiment piece.
8. Attach the sentiment piece to the 2 1/4” x 3/4” piece of Pretty In Pink card stock. Use
Stampinʼ Dimensionals on the back of both the sentiment and heart, then attach to card
front.
 
Your card is complete and ready to use!

Wednesday, November 9, 2011

Thanksgiving Gift

Stamps: French Foliage 120845(w), 121166(c)
Cardstock: Peach Parfait 119794, Very Vanilla 101650, Cajun Craze 119684, Spice Cake designer series paper 124003
Ink:  Classic Stampin' Pads: Old Olive 100702, Cajun Craze 119671, Daffodil Delight 119667
 Accessories:  3/8" Velvet Stitched Ribbon 125637,  Big Shot with Naturally Serif decorative strip sizzlet 113453 , Big Shot Multipurpose Adhesive Sheets 120805, glue dots 103683

Directions:
1.  click here for tutorial on box
2. Punch one Decorative Label in very vanilla and one in cajun craze.  Cut the cajun craze one in half lengthwise and glue to the back of the vanilla one as a border (see photo).
3. Attach a piece of ribbon around the box about 1.5" from the bottom.  Attach the label over the ribbon.
3. Cut a 2"x7" strip of designer paper and multipurpose adhesive sheet and stick together.  Cut into small squares and place over the letters on the Naturally Serif strip to spell "Thankful".  Run through the Big Shot.  Peel and stick the letters onto the label and ribbon.  TIP: start in the center with N and work out.

Elegant Hand-Penned Holiday Card

Embossing just says "fancy"!  And you do two types on this card--but it's really not a fussy card to make.

Supplies needed:
Stamp sets: Hand-Penned Holidays 124310(w), 124312(c) and 115026(w)
Cardstock: Always Artichoke 105119, Cherry Cobbler 119685
Ink: VersaMark Pad 102283
Accessories:  Big Shot with Framed Tulips Embossing Folder 121809, Gold Stampin' Emboss Powder 109129, Heat Tool 100005, Basic Pearl Jewels 119247

Directions:
1.  Cut Always Artichoke cardstock 11" x 4-1/4", score on the long side at 5-1/2" and fold for card base.
2.  Cut Cherry Cobbler cardstock 5-1/4"x4", insert in Framed Tulips embossing folder and run through the Big Shot.
3.  Ink Merry Christmas with VersaMark, stamp it at bottom of cardstock and sprinkle with the gold embossing powder.  Tap off excess and use Heat Tool until set.
4.  Ink the large pine tree with VersaMark and stamp onto cardfront.  Add pearls and attach to card base, centering with about 1/8" border.


Cozy Lodge Christmas Card

Send warm Christmas greetings with this easy-to-make card.
Supplies needed:
Stamp sets: Hand-Penned Holidays 124310(w), 124312(c) and Autumn Days 115452(w), 120000(c)
Cardstock: Garden Green 102584, Whisper White 100730, Frostwood Lodge designer series paper 124002
Ink: Garden Green 102272, Cherry Cobbler 119669
Accessories:  5/8" Satin Chocolate Chip ribbon 125327, Stampin' Sponges 101610, glue dots103683

Directions:
1.  Cut Garden Green cardstock 8-1/2"x 5-1/2", score on the long side at 4-1/4" and fold to make card base.
2.  Cut a piece of Frostwood Lodge designer series paper 5-1/4" x 4" and adhere to card front.
3.  Cut a piece of chocolate chip ribbon 5-1/2" and adhere to card front with glue dots.
4.  Cut a piece of whisper white cardstock 4-1/4" x 2".  Ink the greeting with cherry cobbler ink and stamp onto whisper white.  Sponge around the edge with cherry cobbler ink.
5.  Ink the pine branch design from Autumn Days stamp set in Garden Green.  Stamp once onto scrap paper, than onto the image panel in the upper left corner.  Repeat for lower right corner.  Attach to card front over the ribbon.